| WA8LMF Home Page | Useful Links | Resume ! Updated 24 November 2017 |
The virtual audio level meters from
http://www.darkwooddesigns.co.uk
are very useful tools for setting and monitoring audio levels in amateur radio
soundcard applications. These tools are completely FREE downloads, and will run
on any version of Windows from Windows XP onward. The website offers a
large number of stereo and multi-channel meter designs, both analog and bargraph,
but this one is probably the simplest and most useful for amateur radio
applications:
http://www.darkwooddesigns.co.uk/pc2/meters.html#Digital
Click the link "Download Digital Level Meter Version 1.90 installer" on the page to download the .ZIP file containing the installer for this meter. Or download the .EXE file installer contained within the .ZIP file directly from my website here:
Digital-Level-Meter-1.90-Installer.exe
After downloading and installing the program, click the
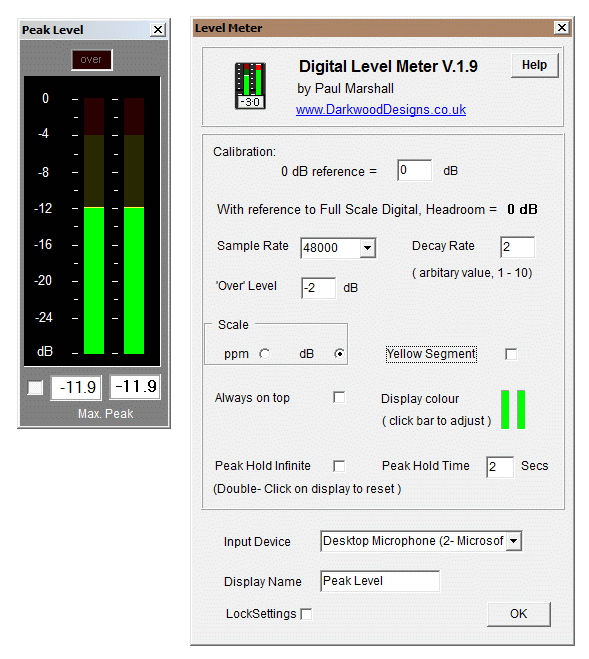
desktop icon ![]() to start. The panel shown at the left below will appear. This meter application
can be run simultaneously alongside any other sound card applications, without
conflict. Right-click anywhere in the panel to show the configuration menu
dialog shown at the right.
to start. The panel shown at the left below will appear. This meter application
can be run simultaneously alongside any other sound card applications, without
conflict. Right-click anywhere in the panel to show the configuration menu
dialog shown at the right.
If your computer has more than one sound input device, select the correct one with the "Input Device" pulldown menu near the bottom of the setup dialog.

Once you select the sound device that corresponds to your sound card interface (or a laptop's built-in Mic that can hear a nearby radio speaker), you should see the green level bars jump upwards in step with the radio's audio. "0 dB" at the top of the scale represents the absolute maximum input level the sound device can accept without distortion. Normally, you would want adjust the Windows recording controls or a physical volume knob on the interface device to yield peaks a few dB below the max level.
This setup can measure FM transmit audio level (deviation or modulation) fairly precisely as well. You can use this setup to set the transmit level of soundcard applications or packet TNCs. A second second radio to listen to the transmitter being measured will be required. This could be a hand-held, a scanner or another transceiver that can monitor the same band. Connect the audio-out (speaker, headphone jack or data port) to the audio INPUT of the PC running the meter application. (Or place the second radio within earshot of a laptop or tablet's built-in microphone.)
NOTE: You can create a very precise measuring tool by metering the raw discriminator audio pin (sometimes labeled "9600 baud RX") on the 6-pin mini-DIN "data" port of radios that have this connector. [Complete details on the 6-pin Mini-DIN data port, including pin-outs, are here on my website: 6-Pin-MiniDin-Data-Connector ]
To calibrate the meter on FM, un-squelch the receiver while no signal is present so you are hearing (and metering) the receiver's white noise hiss. Note the level on the meters. When a signal is present, the noise goes away, i.e. the receiver "quiets". In the typical narrowband FM receiver, the peak level of no-signal white noise and the level of a 1KHz tone transmitted at "100% modulation" (5KHz deviation) will be approximately the same. If the white noise doesn't happen to read full-scale on the meters, you can tweak the meter calibration by changing the value in the "0 dB reference" box near the top of the configuration dialog. Try entering something like -6 or -10 dB here. Vary the value entered until the white noise value jitters around "0 dB".
| For voice operation, the meters should just
barely hit 100% of the un-squelched white noise value on voice peaks.
For sound card digi-mode applications or packet TNCs, audio levels of the transmitted tones should be around 3 Kz deviation (about 60% of the 5 KHz peak voice deviation level). This will read as a level about 4.5 dB LOWER than the raw un-squelched white noise or peak voice level on the audio meters. To adjust the transmitted level, use a sound card program with a "Tune" button such as mmSSTV or FLdigi. Clicking the "Tune" button should key the transmitter and send a continuous tone. On a hardware TNC, activate it's "CAL" mode. Adjust the Windows sound PLAYBACK controls and/or any hardware "Transmit" level control knob on the interface, until the level described above shows on the listening receiver meter. Then release the "Tune" button. |
Keeping the data audio level down is especially critical with modes that use complex modulation schemes with multiple simultaneous audio tones. This includes modes such as PSK, "EasyPal" SSTV or MT-63. The peak level of these modes must be kept FAR below maximum transmit level to prevent these complex signals from being clipped or distorted by the transmitter's internal deviation limiter on FM. And kept far below the maximum input level of the sound card at the receiving end, for the same reason.
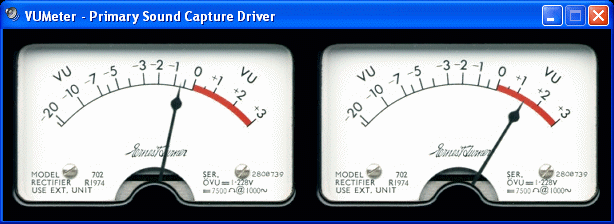
This incredibly realistic pair of analog VU meters, direct from tape recorders and broadcast consoles of the 1970's, is an alternative, if you want to go really "retro".
This freeware tool can monitor both INPUT (Record/RX) levels and OUTPUT (Playback/TX) levels. The level meter above can only read INPUT/RX levels. This application can be used in the same way as the level meter above. You get the options menu in exactly the same way as well; by right-clicking anywhere in the picture.
Multiple copies of this program, installed into different folders, can be run at the same time, allowing you to meter RX levels and TX levels at the same time.

Download from http://vuplayer.com/other.php .
To study the radio RX and TX audio in far more detail, consider the freeware Visual Analyzer that converts your sound card into the equivalent of an entire rack of audio test gear. Go to my page at : Visual Analyzer
